Paving stones are one of the most versatile elements of the hardscape industry. Coming in a wide variety of shapes and sizes, you are sure to find something that fits your project – no matter how big, small or intricate it is.
Choosing their color is easy as it’s largely based on preference and pavers have an extensive collection of colors. Picking the correct material is a bit harder, because concrete, porcelain and stone pavers each have different strengths and weaknesses.
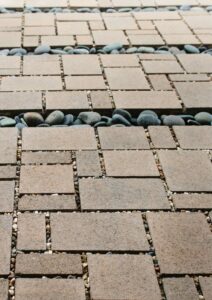
On the other hand, when it comes to their size, paving stones come in either big or small, and homeowners might have trouble correctly choosing the best size for their project.
This is why, in this post, we will cover the basics about small pavers – when to use them, their pros and cons and how to install them! With that in mind, let’s get going:
When to Pick Small Paving Stones
Usually speaking, larger stones are used to cover the bulk of your yard/patio, while smaller stones are placed as their border.
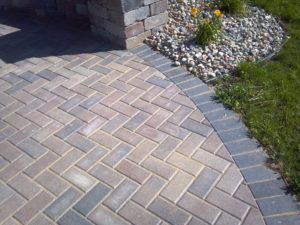
However, that is not all they are good for. If you want a more intricate floor design, then you should choose small paving stones for your area as their design flexibility is unmatched. If that was not enough, smaller pavers are also awesome at making smaller spaces feel larger!
This means that even though the size of a space tends to dictate the size of your paving stones, rules-of-thumb can be broken and, as such, there are numerous examples of large spaces filled with smaller stones and vice-versa that are visually stunning.
Pros and Cons of Small Paving Stones
Pro: Ease of Installation
While the installation process of pavers is more complex than most people think, small paving stones take the lead for being way simpler to install. The biggest stones can take as much as an entire team of people working together.
Con: More Susceptible to Weeds
Joints are defined as the spaces between each paver stone. After their installation, smaller paving stones will leave many more joints than bigger ones would. As such, structures built with small pavers are more prone to suffer from mold and weeds, which could wreak havoc on the stones if left untreated.
However, it’s possible to mitigate this issue with regular cleaning or, if you are looking for a more permanent solution, sealing, which makes the surface of paver stones impermeable, protecting them from staining and structural damage.
Pro: Intricate Designs
Unlike their smaller counterparts, larger paving stones have neither the variety nor the design flexibility to form intricate floor patterns. Even though there are pavers for all sizes, smaller pavers are much more flexible as they can be mixed-and-matched at will.
Con: Ants Could be a Problem
Just like small paving stones are more susceptible to weeds and structural damage caused by water, they are also more prone to have problem with ants due to the large amount of joints needed to create the patio.
How to Install Small Paving Stones
While the process to install pavers might vary depending on your location’s soil, it usually goes like this:
Draw the Plan
To ensure the installation goes as smoothly as possible, you should have a plan. Remember to check with your local utility companies to avoid interfering with any cables and pipes in your terrain. Don’t forget to make sure you have a permit if you happen to need one!
Outline the Area
Outlining the area helps workers to see exactly what the work area is. One of the best approaches to outline the area is to use stake drivers and string, encircling the entire structure.
Scope your Slope
If you want to avoid water pooling on your pavers, you have to make sure this is done right. For this to happen, your paving stones need to be slightly above the surface of the surrounding ground at ALL points. This ensures adequate drainage throughout the entirety of your project.
A good rule-of-thumb to keep in mind is to create a slope of 1 inch to every 4 feet of length, which should be added only in the opposite direction you want the water to flow.
Excavate
This step is the most time-consuming one! Since pavers need to be in direct contact with the ground in order to stay in place, you need to dig deep enough to lay the correct amount of base material for your project.
Paving stones that will be exposed to foot traffic will need 4 to 6 inches of base material. On the other end of the scale, areas that will have to support the load of trucks might need 12 inches of base material.
Add Crushed Gravel
Add 6 inches of gravel to the excavated area and, with the aid of a hand tamper, compact it. Repeat this process as needed until your base is at the right depth for your project.
Install Edge Restraints
Edge restraints serve a very important function: they hold the shape of your project over the years. Place them around the perimeter of the area and secure them into the ground by pounding 12-inch spikes.
If your area happens to be shaped irregularly, make sure to cut the restraints to follow the edges of your project.
Add Sand
As soon as you are done with the previous step, add a layer at least 1-inch thick of sand and adjust it as necessary.
Install the Small Paving Stones
Place the pavers above the sand following the pattern of your choice and push them against the sand, making sure the sides of adjacent stones are as close as possible. Avoid leaving large gaps between each paving stone to minimize the amount of sand needed to fill them in.
Tamping
Once all pavers are placed and have been pushed against the sand, create pressure on the paving stones using a plate compactor. Repeat this process at least a few times to make sure everything settles in place.
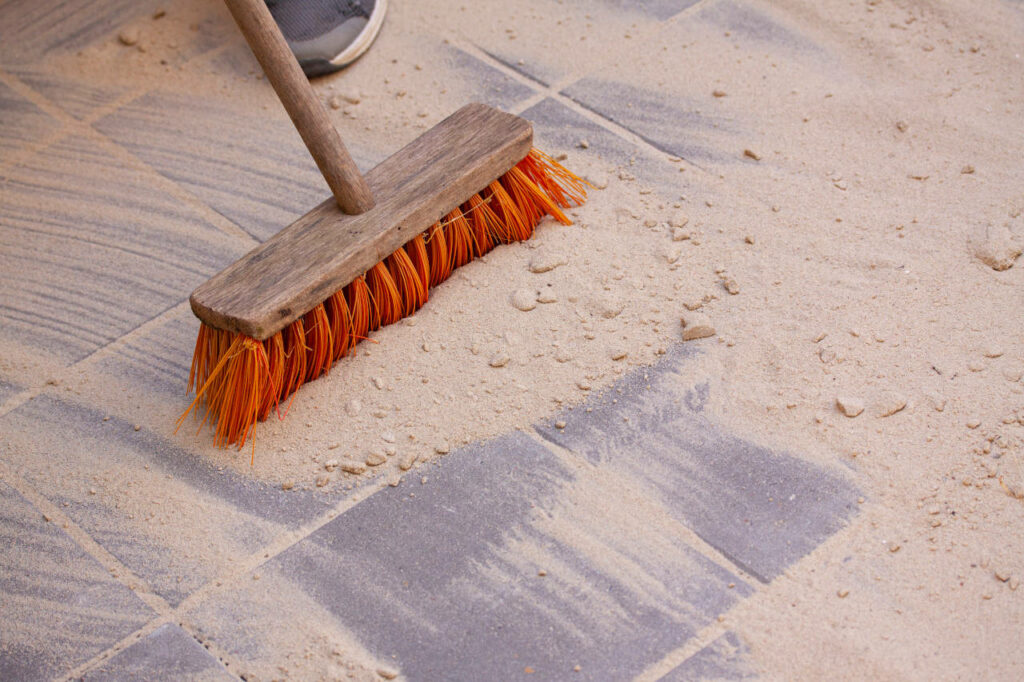
Sweep Sand into Joints
If you got to this step – congratulations, this is the last one!
Once you have tamped the small paving stones, fill the joints between them with sand generously. This is best done with the aid of a broom, which will help sweep poured sand into the cracks. Repeat this until every joint is filled with sand, which helps locking the pavers in place.
Get Professional Help
Deciding which kind of paving stones will fit better into your dream yard, driveway or patio is indeed a tough task. Even if you are past that point, installing them can be a hard and tedious process and may come with unexpected challenges that are unique to your location.
To ensure the end result will be as envisioned in your wildest dreams, the best course of action is to hire qualified professionals to help you out.
We at S&S Pavers have been providing services in the installation and maintenance of paving stones for over a decade. We could also give you some ideas on how to approach your project from the aesthetic point of view.
If you happen to be around the Manatee and Sarasota counties, why not get in contact with us?
Give us a call anytime at 941-773-3098 or email us at sales@sspavers.com for a free estimate on our services. We would be glad to hear from you and help you out!