A well-designed driveway serves as a functional element of your home and contributes significantly to its overall aesthetics and curb appeal. Today, we want to focus on this subject and give you a complete guide on paver driveway installation.
Among the various options available, paver driveways have gained immense popularity due to their durability, versatility, and visual appeal. If you’re considering upgrading your driveway, opting for a paver installation could be an excellent choice.
In this comprehensive guide, we’ll delve into everything you need to know about paver driveway installation, from planning to execution.
Paver driveway installation: planning and choosing pavers

Planning Stage
Before diving into the actual paver driveway installation process, you should know that careful planning is essential to ensure a successful outcome.
So start by assessing your needs, preferences, and budget. Consider the style of your home, the existing landscape, and any architectural features that you want to complement your driveway design.
Are you looking for something modern and sleek, or perhaps a more rustic and natural look? Understanding your aesthetic preferences will guide your choice of materials and design elements.
When it comes to paver driveway installation, it is important to pay special attention to drainage and slope. Proper drainage is crucial to prevent water from pooling on your driveway, which can lead to erosion and damage over time. Make sure to evaluate the slope of your property to determine if any grading or leveling is necessary to ensure water flows away from your home and driveway.
Also, familiarize yourself with local regulations and zoning ordinances that may impact your driveway installation.
These regulations can dictate factors such as the permissible materials, driveway width, setback requirements from property lines, and any necessary permits or approvals. Failure to comply with these regulations can result in costly fines or even the need to redo the installation.
Read also: How Wide Should A Driveway Be? All About Driveway Width
Selecting the right pavers
Pavers come in a variety of materials, shapes, sizes, and colors, offering endless design possibilities. Each material has its unique characteristics, so choose one that aligns with your aesthetic vision and functional requirements.
When selecting pavers for your paver driveway installation, it’s essential to consider not only their aesthetic appeal but also their practical aspects.
Factors such as durability, maintenance requirements, and cost should all be weighed carefully to ensure that your chosen pavers not only enhance the beauty of your outdoor space but also withstand the test of time.
Concrete pavers
Concrete pavers, widely embraced for their affordability and durability, provide a solid foundation for various outdoor projects.
Their versatility extends to their ability to mimic the look of more expensive materials like natural stone or brick, making them a cost-effective choice without compromising on style.
With an array of colors, textures, and patterns available, concrete pavers offer boundless opportunities for creative expression in landscaping and hardscaping projects.
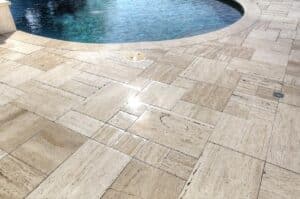
Natural stone pavers
Natural stone pavers are prized for their innate beauty and unique variations, adding a touch of luxury to outdoor spaces.
Whether it’s the rugged allure of flagstone, the refined sophistication of travertine, or the timeless appeal of granite, natural stone pavers imbue landscapes with a sense of organic charm and enduring elegance.
While they may require a higher initial investment, their unparalleled durability, and timeless aesthetics make them a worthwhile investment for discerning homeowners.
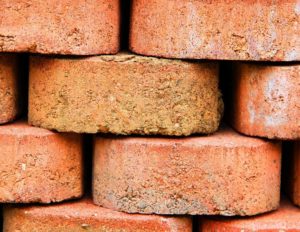
Brick pavers
Brick pavers, steeped in tradition and heritage, offer a warm, inviting ambiance that harkens back to simpler times.
With their classic appeal and enduring charm, brick pavers are a popular choice for pathways, patios, and driveways, imparting a sense of timeless elegance to any outdoor setting.

Paver driveway installation in 5 steps
Once you have everything sorted out, follow the steps below – but make sure to consult professional guidance in case any doubt arises.
1. Preparing the site
The first and most important step in a paver driveway installation process is to ensure proper preparation of the site. This is crucial for the longevity and stability of your paver driveway.
Start by marking the layout of the driveway using stakes and strings. Excavate the area to the desired depth, accounting for the thickness of the base and pavers, as well as any necessary slope for drainage. Remove any vegetation, debris, or obstacles from the site.
2. Base installation
The base serves as the foundation for your paver driveway installation, providing stability and preventing shifting or settling over time.
Depending on the soil conditions and climate, choose an appropriate base material such as crushed stone, gravel, or sand. Compact the base thoroughly using a plate compactor to achieve a firm, level surface.
With this layer done, now you add a 1-inch layer of sand on top of it. This one you don’t compact – just screed to ensure proper leveling.
3. Laying the pavers
With the base in place, it’s time to lay the pavers according to your chosen design pattern. Start from one corner and work your way across, ensuring proper alignment and spacing between each paver.
Use a rubber mallet to gently tap the pavers into place and maintain a consistent level throughout the installation process. Cut pavers as needed to fit around edges or curves.
Read also: How To Lay Pavers For A Driveway In 7 Easy Steps
4. Edging and borders
Installing edging or borders along the perimeter of your paver driveway not only enhances its aesthetic appeal but also helps contain the pavers and prevent shifting or spreading.
Choose from a variety of materials such as concrete, plastic, or metal edging, depending on your preference and budget. Secure the edging firmly in place using spikes or adhesive.
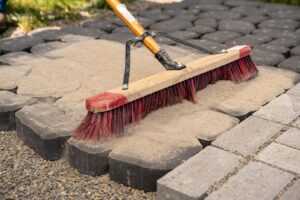
5. Joint sand and sealant
Once the pavers are laid, fill the joints between them with polymeric sand, which hardens when activated with water, providing stability and preventing weed growth. After applying the sand, use a broom to sweep it into the joints and remove any excess.
Finally, apply a sealant to protect the pavers from stains, moisture, and UV damage, prolonging their lifespan and maintaining their appearance.

Get a professional paver driveway installation today!
A paver driveway installation not only adds value and functionality to your home but also enhances its curb appeal and visual appeal. By following the steps outlined in this guide, you can ensure a successful paver driveway installation that will withstand the test of time and leave a lasting impression.
However, DIY is dangerous when we are talking about hardscape. The workload is heavy and complex, and mistakes can cost you a great sum of money. If you are not absolutely sure that you can tackle a paver driveway installation by yourself, your best course of action is to hire professionals to help you.
We here at S&S Pavers, over the course of our 14 years of experience, have been called many times to fix DIY installations that went terribly bad for lack of proper techniques. Trust us, you don’t want that to be you.
So don’t take any chances, look for professional hardscape contractors in your area to help you with your project! If you happen to be around our area of activity, the Sarasota and Manatee counties, in FL, you can contact us anytime for a free estimate on our products and services.